
Dental Ergonomics: Posture, Chair Positioning, and Four-Handed Dentistry
Dr. Vandana Tanwar
Contributing Dental Clinician
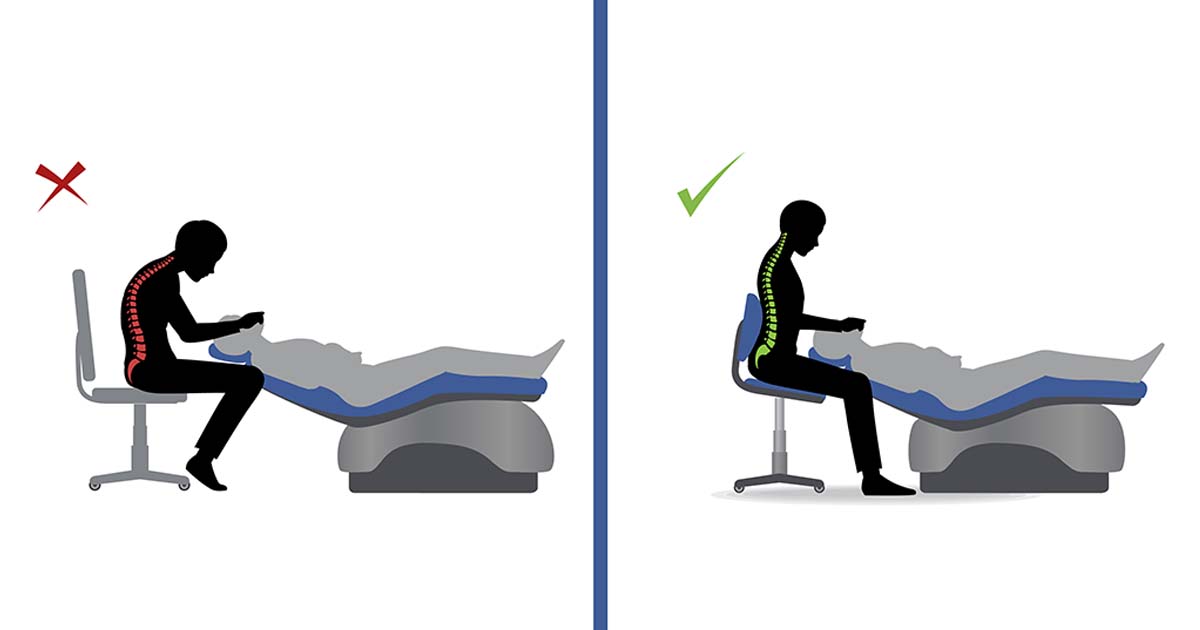
Dental Ergonomics for Dentists: Posture, Chair Positioning, and Four-Handed Dentistry - Dentists must maintain precision and focus for long hours in static positions, which can take a serious toll on the body if they ignore proper ergonomics. Poor posture and awkward positioning can lead to chronic neck, back, and shoulder pain, ultimately affecting both performance and long-term health.
That’s why understanding and applying the right dental ergonomics is essential for every dental professional. From correct sitting posture and patient positioning to ideal operating zones and instrument handling, this blog covers everything you need to work efficiently and stay pain-free.
The Ideal Posture that should be followed:
- Head: Incline the head slightly forward and orient it over the shoulders. Align the interpupillary line horizontally at 15 to 20 degrees.
- Torso: The torso should be upright to promote the natural curvature of the spine. Position the chair’s backrest to provide lumbar support if needed.
- Upper arms, elbows, and shoulders: Relax the arms at the sides, keep the elbows from sticking out, position the forearms in front, and orient the shoulders over the hips.
- Wrists: Keep them straight in a neutral position.
- Fingertips: Align them so they do not obstruct the operative site and grip the instrument correctly.
- Seated posture: Seating height should be similar to knee height, with hips slightly higher than the knees. One can tilt the stool slightly forward.
- Feet: Place the feet flat on the floor with the knees positioned vertically.
- Rheostat/Foot pedal positioning: Place it closer to the operator so that the knee is at about 90–100 degrees. If placed farther, the dentist might have to slouch to the other side, ultimately leading to back and neck strain.
Read Also: Ergonomics in Dentistry: Avoiding Occupational Risks
Patient Positioning:
Determine the correct patient positioning according to the dentist’s natural posture and reference point, allowing them to achieve optimal performance without physical strain. The right patient and operator’s position help in the welfare of both individuals. A patient seated comfortably is more relaxed, has less muscle tension, and cooperates better with the dentist.
Perform most dental procedures in a seated position, except for a few. Avoid any uncomfortable or unnatural position when positioning the patient, whether the operator is standing or seated during the procedure. A dental chair should provide full body support to the patient in any position. The chair usually has an adjustable headrest which helps in resting the patient’s head; contoured chairs further help with adequate support. Most chairs are programmable, and the dentist can adjust them with just a button on the chair’s instrument platform.
Let’s now examine the operating positions that dentists should follow in detail:
Operating Positions:
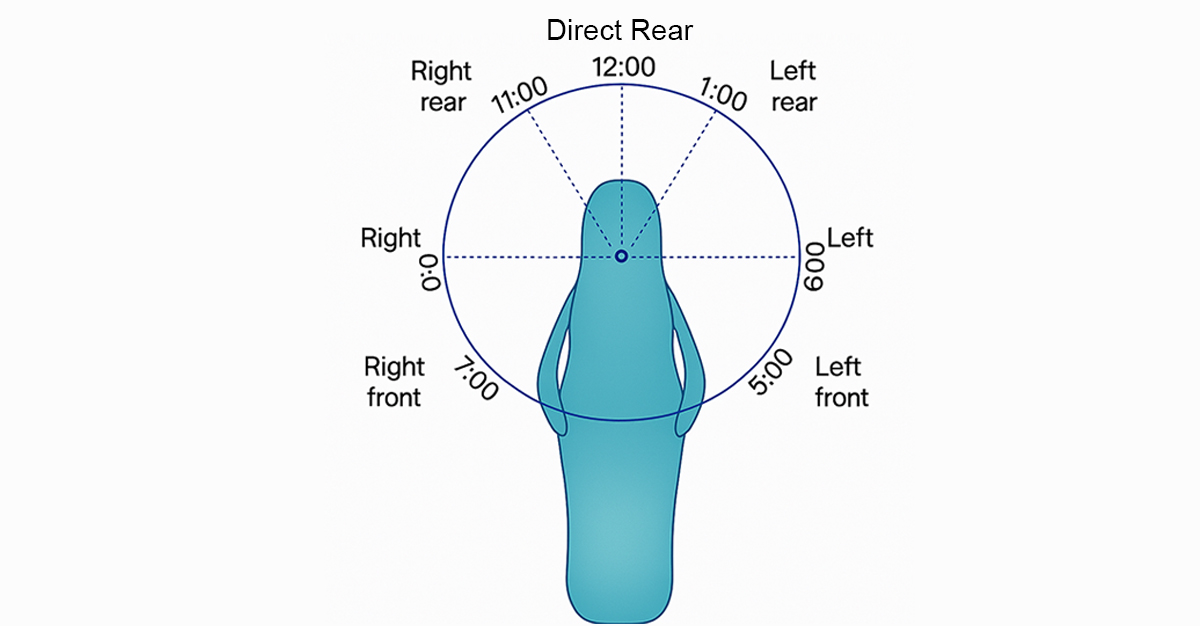
Describe operating positions according to the operator’s location or the position of the operator’s arms in relation to the patient.
- A right-handed dentist mostly uses three positions:
a. Right front, also known as the 7 o’clock position
b. Right, also known as the 9 o’clock position
c. Right rear, also known as the 11 o’clock position
- A left-handed operator uses the following positions:
a. Left front, also known as the 5 o’clock position
b. Left, also known as the 3 o’clock position
c. Left rear, also known as the 1 o’clock position
- Another position often used is the direct rear position, or the 12 o’clock position. As a rule, position the teeth being treated at the same level as the operator’s elbow.
The operating positions described below apply to right-handed operators. Left-handed operators can substitute them accordingly, as they are generally the exact opposite of those for a right-handed dentist.
Right Front Position:
This position helps in the examination and treatment of mandibular anterior teeth, mandibular posterior teeth (especially on the right side), and maxillary anterior teeth. Tilt the patient’s head toward the operator, as often advised.
Right Position:
In the right position, the operator is directly to the right of the patient. This position is helpful for operating on the facial surfaces of maxillary and mandibular right posterior teeth. It is also useful for the occlusal surfaces of mandibular right posterior teeth.
Right Rear Position:
In this position, the operator is behind and slightly to the right of the patient. Position the left arm around the patient’s head. From this position, view the lingual and incisal (occlusal) surfaces of the maxillary teeth using a mouth mirror. Observe the left mandibular teeth in direct vision. Use a mouth mirror to improve visibility, reflect light, and aid retraction.
Direct Rear Position:
Adopt this positioning to access the lingual surfaces of the mandibular anterior teeth during operation. The operator is located directly behind the patient and looks down over the patient’s head.
Procedure-wise recommended Chair Positions:
| Procedure | Chair Position | Description of Chair Setup |
|---|---|---|
| Routine Check-ups and Cleanings | Slightly reclined (45-60°) | The patient is reclined at a moderate angle for easy access to the teeth. The headrest should be adjusted to align with the dentist’s working position (usually supine). |
| Tooth Extractions (Non-surgical) | Fully reclined (90°) | Patient should be fully reclined for maximal access to both upper and lower teeth. The headrest is slightly tilted back to keep the head in a neutral position. |
| Tooth Extractions (Surgical) | Fully reclined, slight head tilt backward (30-45° tilt) | For maxillary extractions, headrest should be angled backward slightly (for good access to upper teeth). For mandibular extractions, the angle can stay more flat. This helps the operator to access the site easily. |
| Root Canal Treatments | Fully reclined (90°), slight head tilt downward (10-20°) | This is for good visibility, especially for anterior or posterior root canals. The patient’s head should be slightly tilted down for better access to the root of the tooth. |
| Implant Placement | Fully reclined (90°), head tilted slightly backward (15-30°) | For implant surgeries, a fully reclined position ensures access to both upper and lower jaw. Slight tilt of the head backward is ideal for maxillary implants. |
| Fillings and Crowns | Slightly reclined (45-60°) | This position allows for easy access to anterior or posterior teeth. A moderate recline provides comfort for the patient and enables the dentist to easily access the area of concern. |
| Periodontal Scaling and Root Planing | Slightly reclined (45-60°) | A moderate recline helps the dentist access the gums, particularly for lower posterior teeth. The headrest should be slightly angled for optimal access to the treatment area. |
| Orthodontic Adjustments | Slightly reclined (30-45°) | A slight recline is often preferred for orthodontic procedures to keep the patient comfortable while working on the upper or lower jaw. The angle ensures easy access to both anterior and posterior teeth. |
| Endodontic Treatment | Fully reclined (90°), head tilted slightly downward (10-15°) | Similar to root canal treatment, but with a slight tilt of the head downward for access to anterior or posterior teeth. This is especially helpful for visibility and precision during cleaning and shaping of canals. |
| Soft Tissue Surgery | Fully reclined, head tilted slightly backward (20-30°) | For surgical procedures involving soft tissues, such as gingival flaps, the chair should be fully reclined to maximize access to the treatment area. A slight backward tilt of the head allows better visibility and control. |
| Frenectomy (or other soft tissue removal) | Fully reclined (90°), head tilted slightly back (15-20°) | The full recline with a slight backward tilt provides optimal access to the oral cavity, especially for upper lip or lower gum line procedures. |
| Oral Surgery (Cysts, Tumors, Biopsy) | Fully reclined (90°), head tilted back (30-45°) | Full recline allows for the best visibility, especially for oral biopsies, cyst or tumor removal, or impacted tooth extractions. The head tilt helps in reaching the upper arch. |
| Pediatric Dentistry | Slightly reclined or upright (30-45°) | Children often require the chair in an upright position for comfort and security. For procedures like fillings or exams, a slight recline is used for comfort. |
Four-Handed Dentistry:
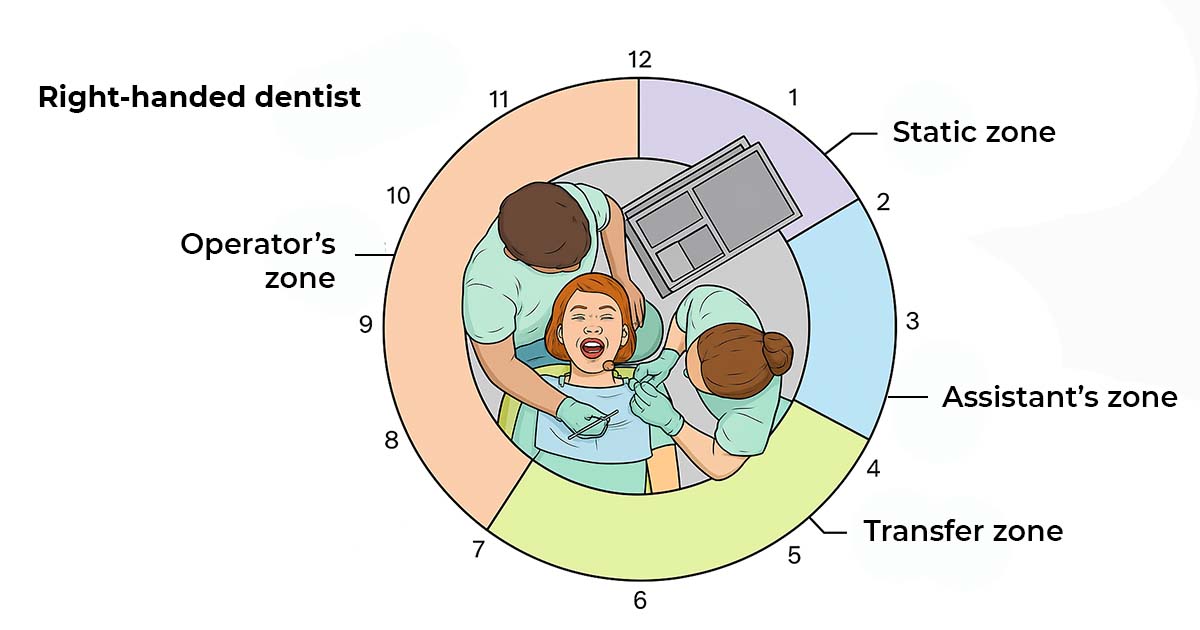
An assistant’s addition in a dental procedure helps to practice four-handed dentistry easily. It makes the dental procedure more comfortable, less exhausting, more stable, and helps in delivering more accurate and efficient treatment. Follow these basic rules when practicing four-handed dentistry:
- The assistant sits on the left side, i.e., opposite the dentist, facing him directly. The working area for the assistant, with a cabinet, should be on the right side. This allows the assistant to help hand over materials and instruments as needed.
- The dentist uses indirect visualization with a mouth mirror. This allows the assistant to achieve improved direct visualization and avoid awkward positions.
Thus, the assistant does not interfere with the dentist’s movement between the 7 o’clock and 12 o’clock positions. Ensure the operating field is clearly visible to both the operator and assistant, and that the assistant has direct access to the patient’s oral cavity. Hand instruments to the operator easily without hindering the procedure.
Optimal assistant seating allows easier access and proximity to the patient. Position the assistant on a stool. Ensure their eyes are 15–20 cm above the dentist’s eyes. The stool should have foot support to allow the assistant to work both within and outside the oral cavity.
Instrument Exchange and Magnification:
Any instrument exchange between the operator and assistant should occur in the exchange zone. This zone is below the patient’s chin and a few inches above the patient’s chest. Avoid exchanging instruments over the patient’s face. During the procedure, the operator should inform the assistant in advance about the next required instrument. This facilitates easy and continuous exchange.
The operator should focus on the operating field and rotate the instrument handle forward to cue the assistant. The assistant takes the instrument from the operator. The operator ensures the assistant has a firm grip before releasing it, and vice versa.
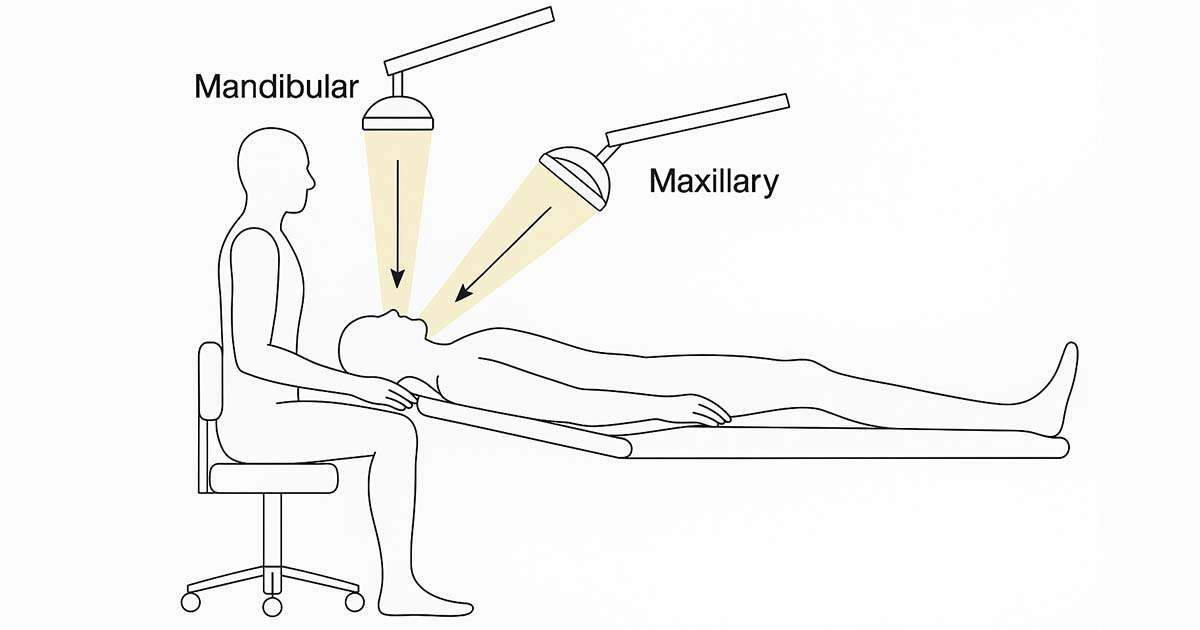
At all times, it is important that the operator has a clear view of the field of operation. Proper magnification—using loupes, indirect vision through a mouth mirror, and appropriate illumination—helps maintain visibility and precision. Align the headlamps parallel to the clinician’s line of sight to eliminate shadows in the operating area and enhance visibility and control.
Conclusion:
Implementing proper dental ergonomics is essential for every dental professional to work efficiently and maintain long-term health. Adopt the ideal posture and ensure correct patient and chair positioning. Practice effective four-handed dentistry. These steps help dentists minimize physical strain and fatigue. These ergonomic practices not only support the dentist’s well-being but also enhance precision and comfort during procedures. Prioritizing these principles helps create a safer, more productive environment, ultimately benefiting both the dental team and the patient.
Written by
Dr. Vandana Tanwar
Contributing Dental Clinician
A contributing clinician at Dentalkart Blogs, Dr. Vandana Tanwar translates day-to-day chair-side learnings into evidence-based guides for dentists working across India.
Keep reading
Browse all →
Dental Airotor Maintenance and Minor Repair Protocol
Dental Airotor Maintenance and Minor Repair ProtocolExtend Handpiece Life Proper airotor handpiece maintenance involves a strict daily protocol of cleaning, lub

Classifying Modern Dental Implant Systems — A Comprehensive Clinical Overview
Classifying Modern Dental Implant SystemsA Comprehensive Clinical Overview Modern dental implant systems are classified based on four key factors: material comp

Fixing Common Curing Light Issues — A Clinician's Troubleshooting Guide
Fixing Common Curing Light IssuesA Clinician's Troubleshooting Guide An underperforming polymerization device leads to composite failure and wasted chair time.
