
Tooth Preparation: A Student's Guide for Full Coverage Dental Crown
Dr. Vandana Tanwar
Contributing Dental Clinician
Tooth preparation can be one of the most challenging tasks for dental students. From understanding the fundamental principles to selecting the correct bur or surgical bur at each step, the learning curve can feel steep. This guide helps you simplify the process and confidently approach tooth preparations for both metal-ceramic and all-ceramic crowns. Whether you're just starting out or reviewing before a preclinical session, walk through this step-by-step overview to master the essentials of tooth preparation for full coverage crowns.
Principles of Tooth Preparation:
The basic principles on which tooth preparations is done:
1. Preservation of tooth structure-
- Minimum reduction of Tooth structure
- Devan’s Law: As stated by Muller De Van, "the perpetual preservation of what remains is more important than the meticulous replacement of what is lost.”
2. Retention and resistance-
- Magnitude of Dislodging Forces
- Primary retention results from sleeve retention provided by the opposing vertical surfaces of the tooth preparation and from wedge-type retention seen in intracoronal retention.
- Secondary retention is obtained through retentive features such as pins, boxes, and grooves.
- Taper: For optimum retention, the preparation requires a 4°–10° convergence. Using a tapering fissure diamond produces a 3° taper; therefore, when the operator aligns the diamond parallel to the long axis of the tooth during preparation, it creates a total convergence of approximately 6°

- Freedom of Displacement: Limiting the freedom of displacement from torquing and twisting forces helps to increase the resistance of the restoration. A single path of insertion provides best retention. Additionally, a proximal box can also be prepared.
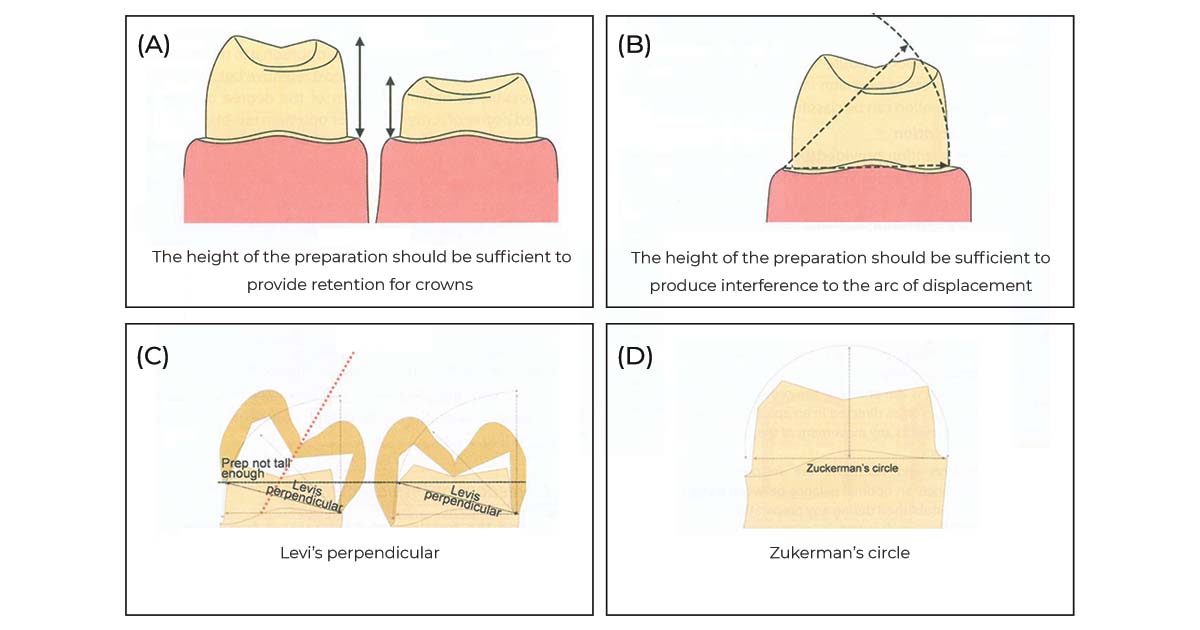
- Length: Greater the height of the crown, better the retention of the restoration. The height of crown improves the retention in the following two ways: Firstly, the height of the prepared tooth should be greater than the tipping arc of displacement, to prevent displacement of the restoration. Second, increase in height increases the area of cementation, thereby improving retention.
- The path of insertion is an imaginary line along which the restoration is placed or removed from the preparation, and clinicians usually prefer a single path of insertion.
3. Structural durability-
- The ability of restoration to withstand destruction due to external forces is known as structural durability. Adequate reduction during preparation is mandatory to obtain adequate thickness of restoration.
| Type of Restoration | Surface | Amount of Reduction |
| Gold Alloys | Functional cusp Non-functional cusp | 1.5 mm 1.0 mm |
| Metal-Ceramic Restorations | Functional cusp Non-functional cusp | 1.5 – 2.0 mm (2.0 mm if veneered with porcelain) 1.0 – 1.5 mm |
| All-Ceramic Restorations | All cusps (occlusal) | Minimum 2.0 mm |
| Malposed Teeth | Occlusal surface | Additional 1.0 mm |
Preparing functional cusp bevels on the palatal cusps of maxillary posterior teeth and the buccal cusps of mandibular posterior teeth improves structural durability, as these cusps bear the maximum masticatory load. In addition, the clinician must ensure adequate axial reduction.
4. Marginal Integrity-
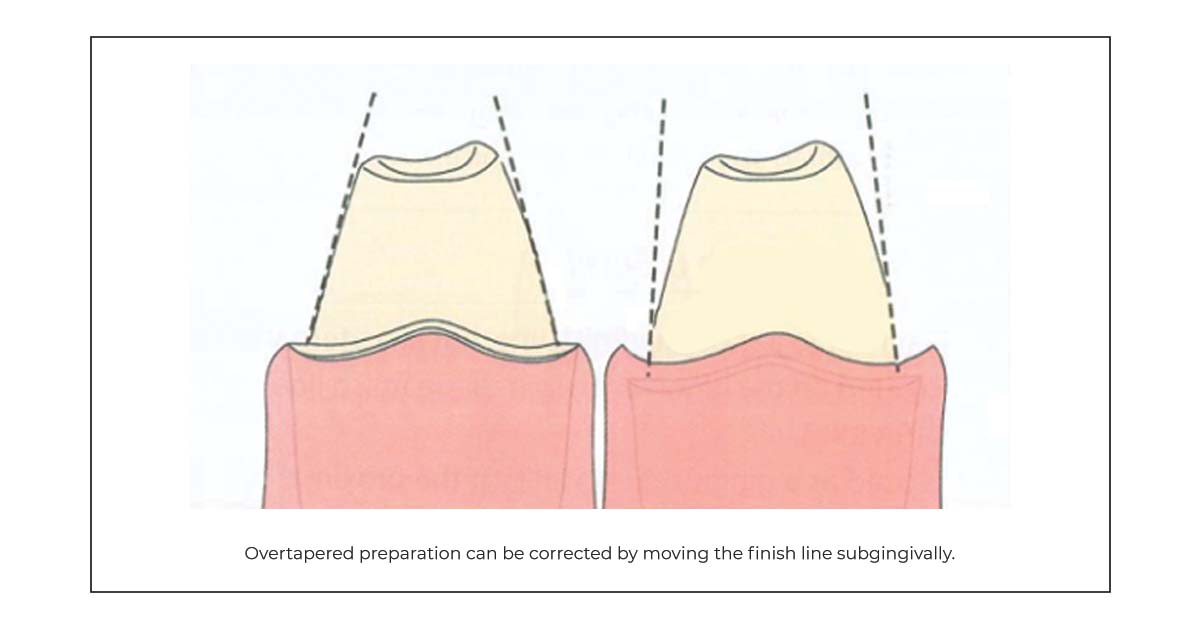
Marginal adaptation and seating of the restoration affect marginal integrity. Good marginal adaptation prevents the percolation of oral fluids (marginal leakage) and secondary caries. Preferably, place restoration margins supragingivally; however, for teeth with short clinical crowns, subgingival caries, or increased retention needs, place margins subgingivally.
5. Finish Line Configurations-
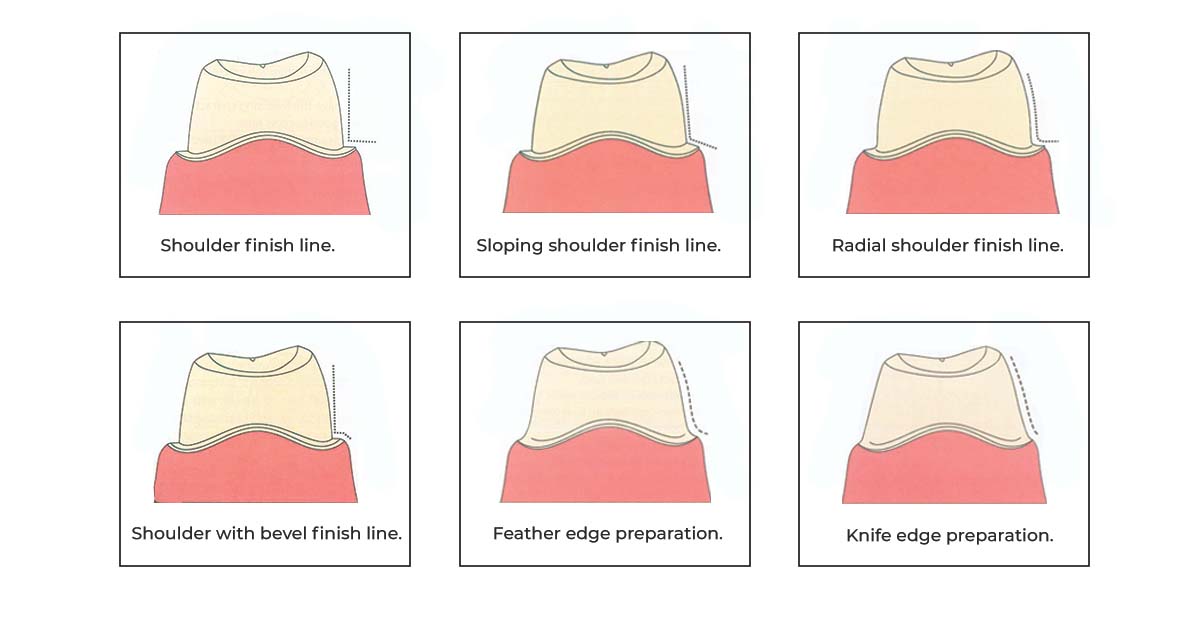
It is a defined margin where the prepared tooth structure meets the unprepared tooth structure. These can be of the following types-
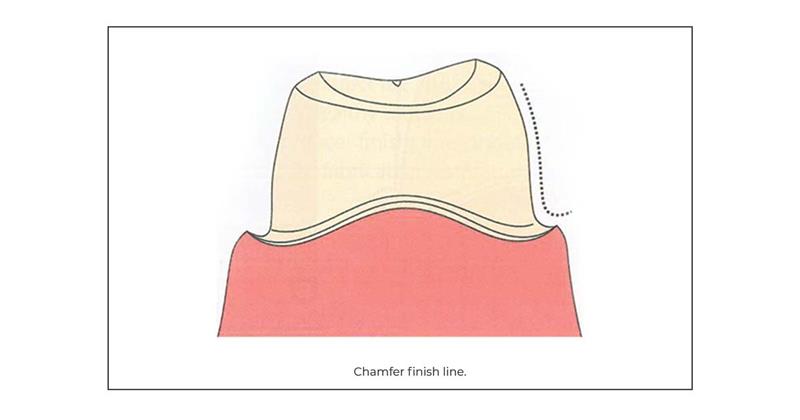
- Chamfer – Preferred for cast metal restorations and lingual margins of metal-ceramic restorations.
- Shoulder – Preferred for all-ceramic restorations and all anterior restorations where aesthetics is the primary concern.
- Radial Shoulder – Preferred for anterior metal-ceramic and all-ceramic crowns.
- Shoulder with a Bevel – Indicated for the facial finish line of metal-ceramic crowns where aesthetics is not a concern.
- Shoulderless or Feather Edge Preparation – Traditionally used for metal crowns.
- Knife Edge – Preferred for the lingual surface of mandibular posterior teeth and undercut surfaces of tipped teeth.
6. Preservation of periodontium:
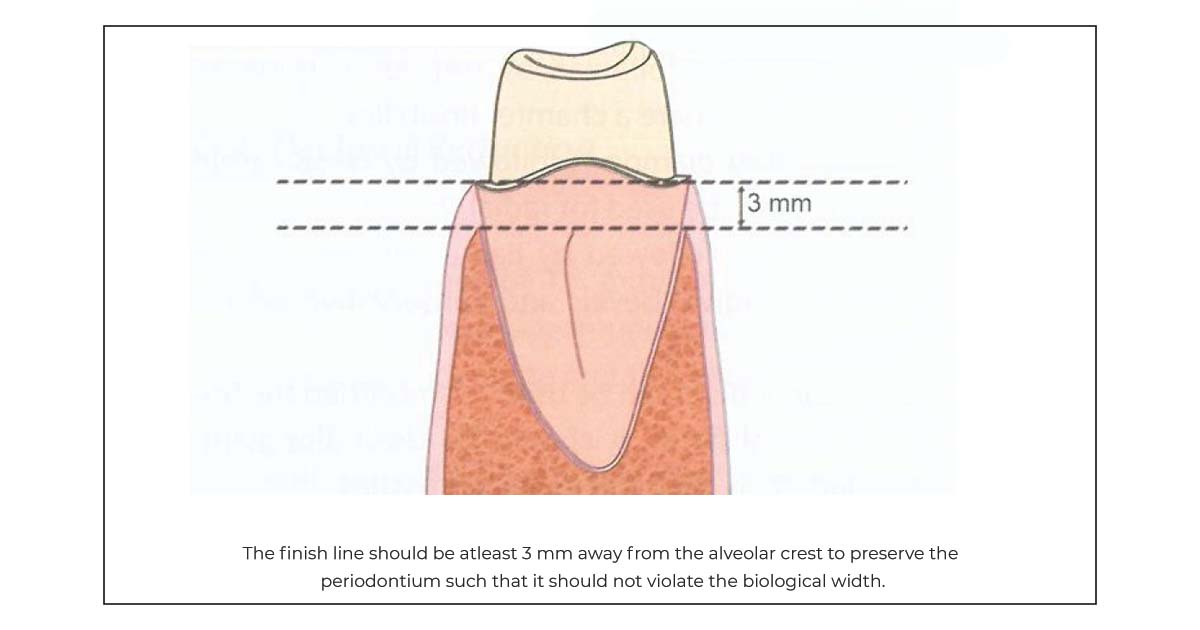
If the distance between the finish line and the alveolar crest (combined width of epithelial and connective tissue attachments) is less than 2.0 mm, the restoration may lead to gingival inflammation, loss of alveolar crest and pocket formation.
Preparation for Full Coverage Crowns:
Commonly used full coverage crowns are-
- Full metal or all metal crowns
- Metal Ceramic crowns
- All ceramic crowns
Read Also: Veneers vs Crowns: What’s the Difference?
Since metal crowns are not used much anymore, we’ll discuss the preparation of metal-ceramic crowns and all-ceramic crowns in this blog.
Steps for Tooth Preparation of Anterior Metal – Ceramic Full Coverage Crowns:
1. Preparation of an Index
- An index is made before the preparation to check for reduction during the procedure.
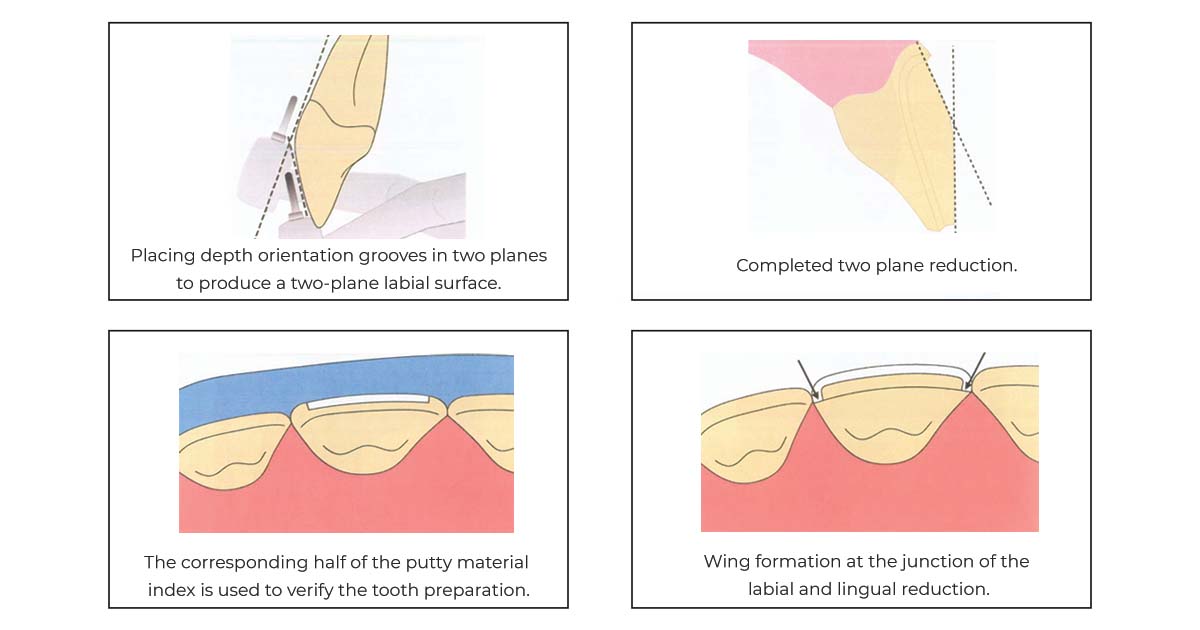
- The clinician records an impression of the area using putty elastomer, capturing the facial and lingual surfaces of the tooth to be prepared and one or two adjacent teeth.
- The clinician removes the index from the teeth and uses a blade to cut along the incisal edges, splitting it into labial and lingual halves. The clinician then cuts the labial half transversely to create incisal and gingival sections.
- These halves are placed over the tooth and verified for adaptation over the tooth structure. The lingual index is verified for adaptation over the incisal edges.
2. Labial Reduction
- Depth orientation grooves are placed on the labial and incisal surfaces using a flat-end tapered diamond point.
- The labial grooves should be at least 1.2 mm in depth to provide adequate thickness of ceramic. Insufficient reduction will lead to:
- A poorly contoured restoration that lacks aesthetic appeal and may affect the health of the surrounding gingiva.
- The shade and translucency of the restoration may not match the adjacent natural teeth.
- After completing the depth orientation grooves, the clinician reduces the enamel islands between the grooves to the same depth using the same bur.
- Facial reduction should be done in two planes, namely the incisal and gingival planes, with a flat-end tapered diamond point.
- The amount of reduction done can be simultaneously verified by placing the index over the prepared tooth and measuring it with a William's probe.
- Extend the labial reduction across the labio-proximal line angles. The area where the labial (1.2–2.0 mm) and lingual (0.7–1.0 mm) reductions meet is called a wing preparation.
3. Incisal Reduction:
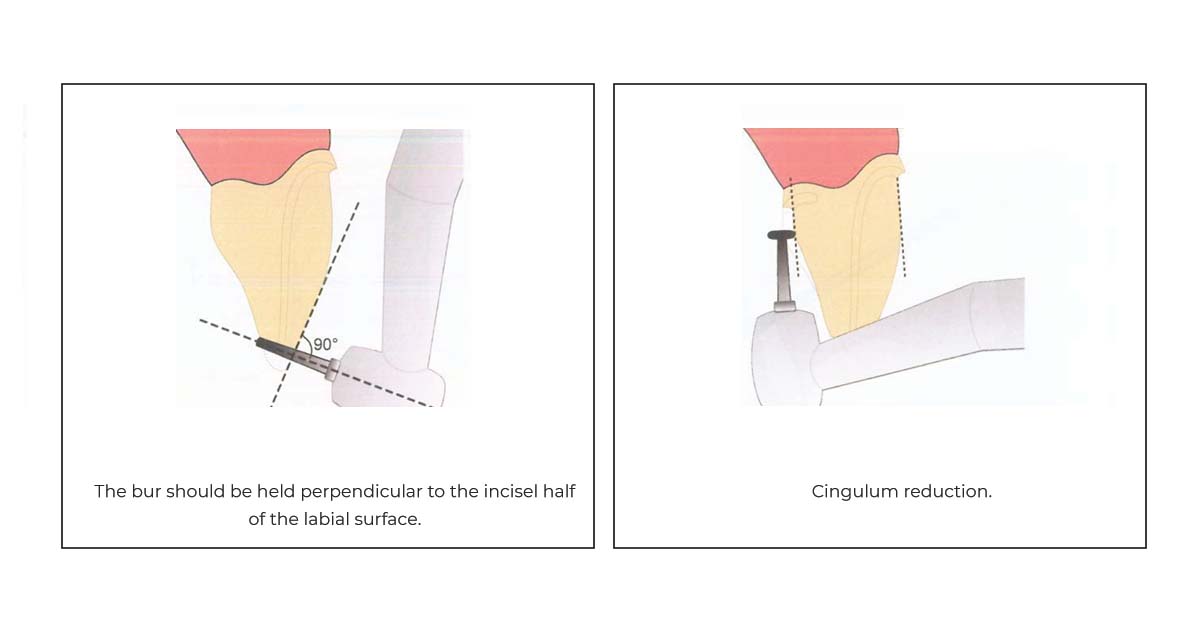
• After labial reduction, make 2.0 mm deep incisal grooves across the incisal edge, holding the flat-end tapered diamond bur perpendicular to the incisal half of the labial reduction.
4. Lingual Reduction:
• Reduce the cingulum with a small wheel diamond to achieve a minimum clearance of 0.7 mm with the opposing teeth, or 1.0 mm if placing a ceramic veneer.
• The lingual wall of the reduced lingual surface should be parallel to the gingival half of the labial surface.
5. Proximal Reduction:
Use a long needle diamond point to break the contact and access the proximal region without damaging adjacent teeth. Form chamfer finish lines on the lingual aspect with a torpedo bur and a radial shoulder finish line on the labial aspect with a radial fissure bur.
Steps for Tooth Preparation of Posterior Metal-Ceramic Full Coverage Crowns:
1. Preparation of Index:
- This is done in a similar way as it was done for the anterior metal-ceramic crown.
2. Occlusal Reduction:
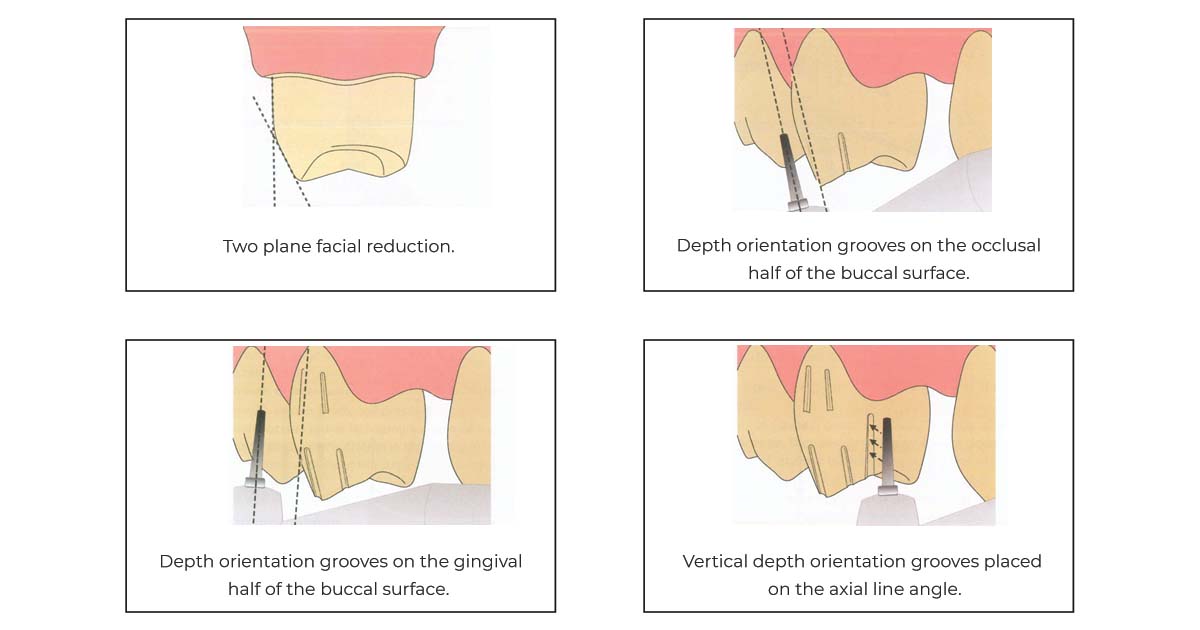
- Depth orientation grooves are made with a round-end tapered diamond point along the cuspal inclines.
- There should be at least 1.5 to 2.0 mm reduction for ceramic coverage.
- Complete the reduction by joining the strips of tooth structure left between the depth orientation grooves.
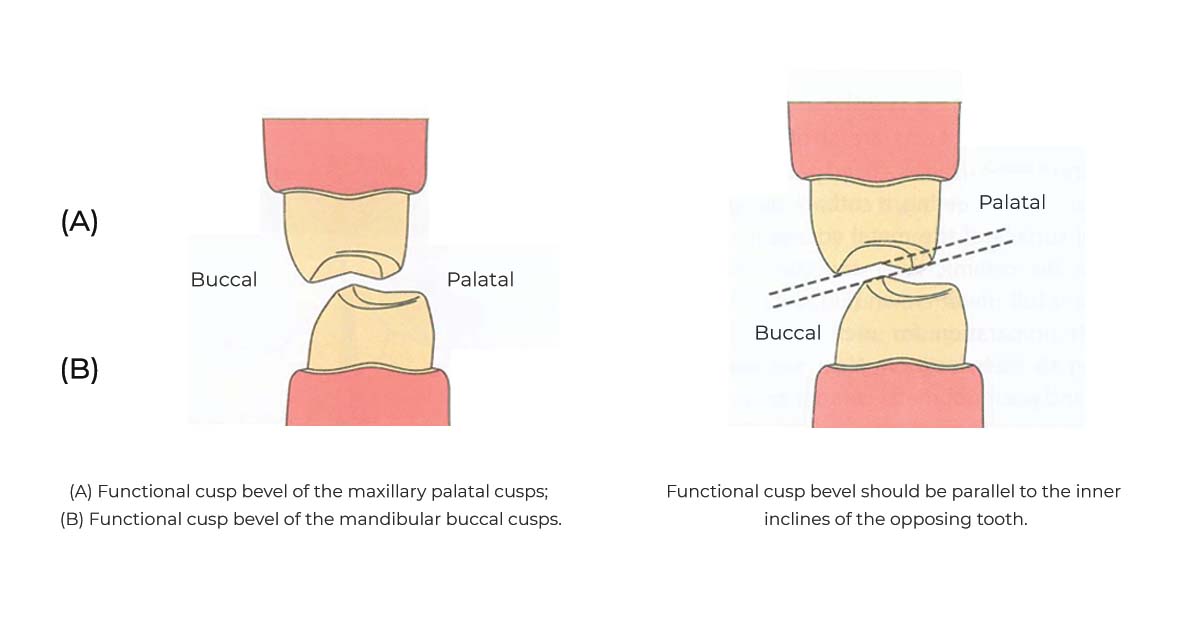
- Prepare a functional cusp bevel on the palatal inclines of maxillary palatal cusps and on the buccal inclines of mandibular buccal cusps.
- The bevel should be 1.5 mm deep for metal coverage and 2.0 mm deep for metal with ceramic veneer.
- Place depth orientation grooves, then perform the reduction.
- The angulation of the bevel should be parallel to the inclination of the opposing cusps.

3. Facial Reduction
- This is also done in two planes, similar to anterior teeth. One should be parallel to the cuspal inclines, and the other should be parallel to the long axis of the tooth.
- Make three vertical orientation grooves that fade gingivally on the occlusal third of the facial surface using a flat-end tapered diamond bur. Remove the tooth structure between these grooves with the same bur.
- The facial reduction should be at least 1.2 mm for base metal-ceramic crowns and 1.4 mm for noble metal-ceramic crowns.
4. Proximal Reduction
- Use a short needle diamond bur in an up-and-down motion on the facial aspect of the interproximal region, or in a faciolingual motion on the occlusal aspect.
5. Lingual Reduction
- Use a torpedo diamond bur on the lingual and proximal walls to create a chamfer finish line.
- A wing of tooth structure forms here due to the transition from deeper facial reduction to shallower lingual reduction. Place this wing lingual to the proximal contact, since the proximal portion of the ceramic veneer lacks translucence.
- Form a radial shoulder on the facial surface using a flat-end tapered diamond bur. Remove enamel lips or reverse bevels to prevent interference.
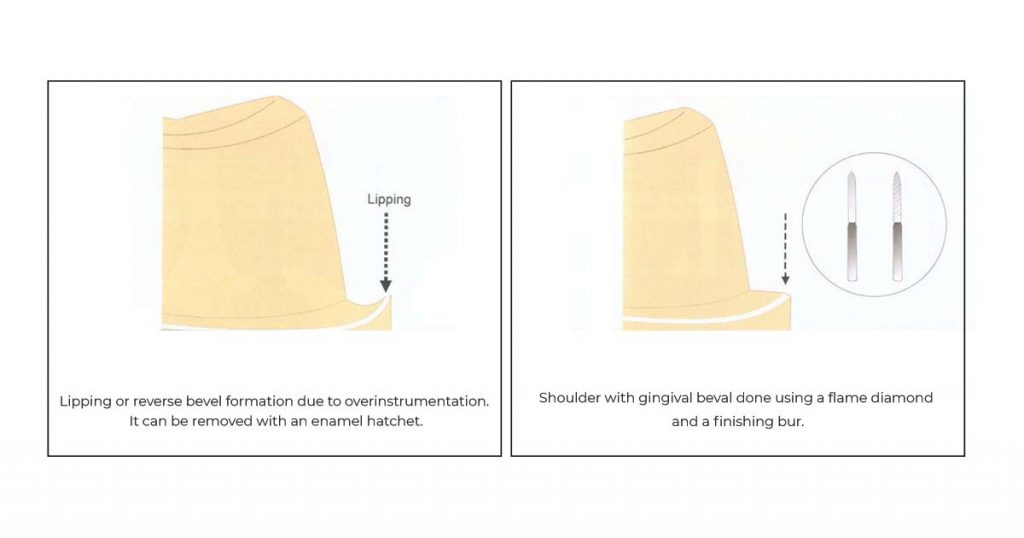
- Optionally, form a shoulder with a gingival bevel. Create a narrow 0.3 mm bevel on the shoulder using the tip of a flame-shaped diamond bur.
Steps for Preparation of All – ceramic Full Coverage Crowns:
1. Labial Reduction:
- Depth orientation grooves are prepared using a flat-end tapered diamond. The grooves should be 1.2 to 1.4 mm deep on the labial surface and 2.0 mm deep on the incisal surface.
- Make the first set of labial grooves parallel to the gingival third of the facial surface, and the second set parallel to the incisal two-thirds of the uncut labial surface.
- This two-plane reduction on the facial surface provides adequate aesthetics without affecting the pulp.
- The tooth structure is removed to a depth of 1.2 to 1.4 mm.
- The end of the flat-end tapered diamond forms the shoulder, while the sides of the bur reduce the axial surface.
2. Incisal Reduction:
- Depth orientation grooves should be made across the incisal edge. They should be about 2.0 mm deep.
- Reduce the enamel islands between these grooves using a flat-end tapering diamond bur.
- The incisal reduction should be perpendicular to the plane of the incisal half of the labial reduction.
3. Lingual Reduction
- Reduce the cingulum using a small wheel diamond.
- Reduce the lingual axial surface using a flat-end tapered diamond.
- The lingual wall should be parallel to the gingival portion of the labial wall.
4. Proximal Reduction
- Its preparation is similar to that of an anterior metal-ceramic crown, except that a radial shoulder finish line is provided along the entire preparation, and the shoulder should be at least 1.0 mm wide and should be uniformly contoured along the line angles of the restoration.
Conclusion
Tooth preparation can seem daunting at first, but with a clear understanding of each step, it becomes a manageable and rewarding skill. This guide aimed to simplify the process and give you a structured overview of the techniques involved in preparing teeth for full coverage crowns—whether metal-ceramic or all-ceramic. By focusing on the fundamental principles and clinical steps, you’ll be better equipped to approach both preclinical practice and patient care with confidence.
And when it comes to gathering your clinical supplies, DentalKart has you covered. From silicone putty and various types of burs to other essential tools required for accurate and efficient tooth preparations, you’ll find everything you need in one place. Equip yourself with the right armamentarium and keep refining your skills — because practice truly makes perfect.
Written by
Dr. Vandana Tanwar
Contributing Dental Clinician
A contributing clinician at Dentalkart Blogs, Dr. Vandana Tanwar translates day-to-day chair-side learnings into evidence-based guides for dentists working across India.
Keep reading
Browse all →
Dental Airotor Maintenance and Minor Repair Protocol
Dental Airotor Maintenance and Minor Repair ProtocolExtend Handpiece Life Proper airotor handpiece maintenance involves a strict daily protocol of cleaning, lub

Classifying Modern Dental Implant Systems — A Comprehensive Clinical Overview
Classifying Modern Dental Implant SystemsA Comprehensive Clinical Overview Modern dental implant systems are classified based on four key factors: material comp

Fixing Common Curing Light Issues — A Clinician's Troubleshooting Guide
Fixing Common Curing Light IssuesA Clinician's Troubleshooting Guide An underperforming polymerization device leads to composite failure and wasted chair time.
