Endodontic Procedure Tray Setup for General Dental Practice

Dr. Gurjeet
Contributing Dental Clinician
How Do You Build an Endodontic Procedure Tray for a General Dental Practice?
Build the tray in three layers:
A lean core tray used for every root canal treatment.
Small add-on kits for molar, calcified and retreatment cases, chosen from the preoperative radiograph.
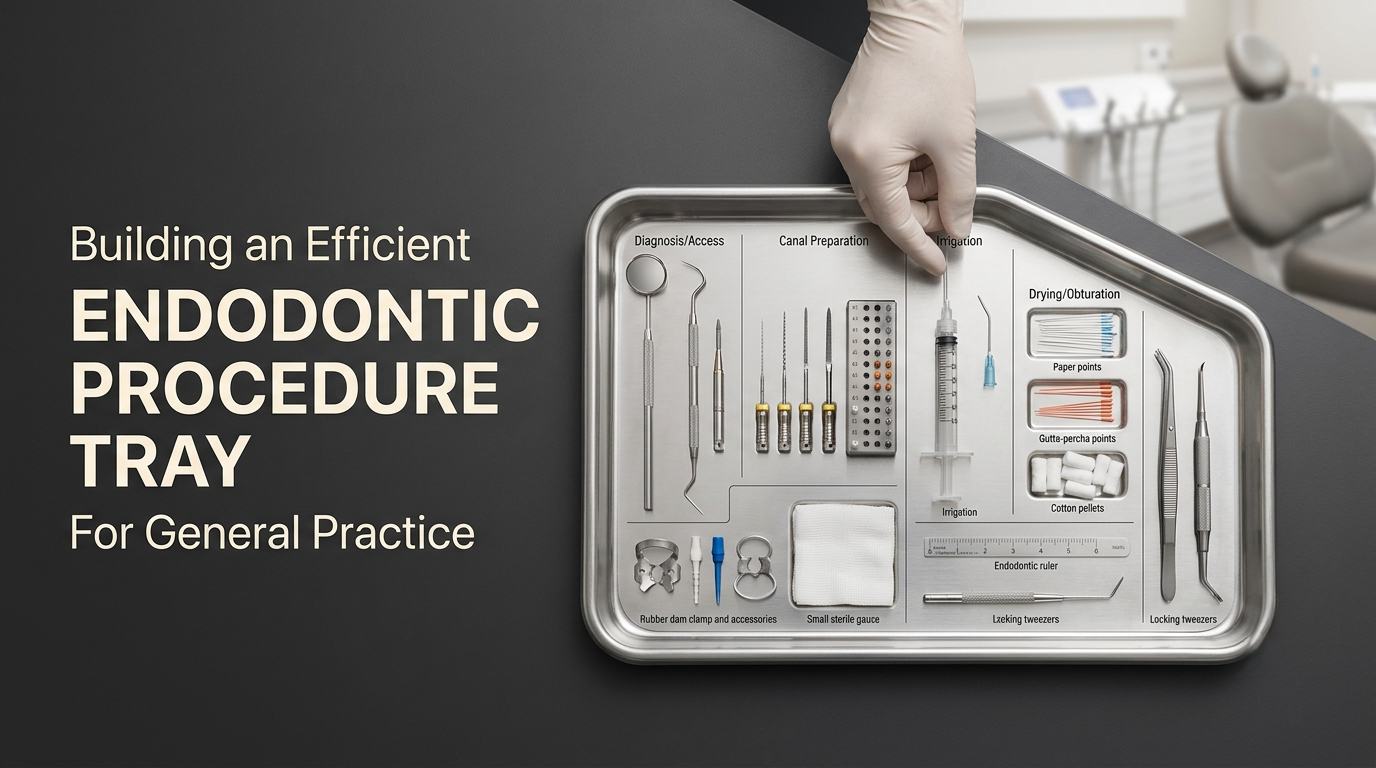
A left-to-right layout in treatment order: anaesthesia, isolation, access, shaping and irrigation, then obturation and seal.
Write the tray list down, and keep enough sets to cover the time each tray spends in sterilisation.
The test of a good tray is simple: once the rubber dam is on, nobody leaves the chair to open a drawer.
What Belongs on the Core Tray, Zone by Zone

Lay the tray out so the assistant works along it in the same direction as the procedure.
Zone | Core contents |
1. Examination and anaesthesia | Mirror, probe, tweezers, aspirating syringe, needles, local anaesthetic cartridges, topical anaesthetic |
2. Isolation | Rubber dam sheet, frame, punch, clamp forceps, clamps for the planned tooth, floss ligature |
3. Access and canal location | Access burs, endodontic explorer (DG16), long-shank excavator |
4. Shaping and irrigation | Hand files ISO 08 to 15 in 21 and 25 mm, the practice's rotary or reciprocating system, irrigation syringes and side-vented needles, measuring gauge or endo ruler |
5. Obturation and seal | Paper points, matched gutta-percha, sealer, mixing pad and spatula, spreader or plugger, heat source if used, temporary filling material |
Anaesthetic cartridges and topical are consumables rather than sterile instruments, so many clinics keep them in a labelled tub beside the tray rather than on it. Either way, they belong to Zone 1 and should be checked at set-up, not fetched after the patient is seated.
Three details are worth settling before you write the list.
Clamps. Stock clamps for the teeth you actually treat most often. In most general practices that means an anterior clamp, a premolar clamp, and clamps for lower and upper molars: usually four or five designs in all.
Diagnostic aids. Pulp testers and apex locators stay off the sterile tray, but they must be at the chair before treatment starts. Our guide to case selection for electric pulp testing explains when an EPT reading is worth taking.
Obturation materials. Put these on the tray at the start; do not fetch them at the end. The obturation step is where trays most often turn out to be incomplete. Match the paper points and gutta-percha points to the taper of your file system, so the master cone fits the prepared canal.
Add-On Kits Keep the Core Tray Lean

Every item on the core tray has to be cleaned, packed and sterilised after every case, whether it was used or not. Rarely needed instruments therefore belong in sealed add-on kits.
Case type (from radiograph) | Add-on kit |
Molar | Extra file sizes, extra paper points and cones, orifice openers or Gates-Glidden drills |
Calcified canals | ISO 06 and 08 files, EDTA gel or solution, long-neck small round burs, ultrasonic tips |
Retreatment | Gutta-percha removal files, solvent, Hedström files, ultrasonic tips |
Difficult anaesthesia | Supplemental technique kit, such as intraligamentary anaesthesia |
Note on magnification: loupes or a microscope make molar cases, especially finding an MB2, far more predictable. They are equipment rather than a kit item, so they do not go in the add-on kit; just make sure they are at the chair when the molar kit is.
Choose the add-on kit at the treatment planning stage, from the radiograph, rather than after the access cavity is cut. A previously filled canal, a receded pulp chamber or the outline of a third canal on the film should each prompt the right kit before the patient is seated.
Irrigation belongs on the core tray, not in an add-on kit. Fix one sodium hypochlorite concentration and one chelating agent in the written protocol, so every chair prepares the same syringes. The clinician's guide to endodontic irrigating solutions covers the role of each solution.
How Many Trays Does the Practice Need?
The number of trays depends on the reprocessing cycle, not just the appointment book. A tray is out of use from the moment it leaves the chair until it has been cleaned, packed, sterilised, dried and cooled.
Worked example (hypothetical): a practice books an RCT every 60 minutes in one operatory, and reprocessing a tray takes 90 minutes, including cleaning, packing and a full autoclave cycle with drying.
At any moment, one tray is at the chair and one or two are being reprocessed, because a 90-minute cycle spans one and a half appointments. Add a spare for a failed indicator or a dropped instrument, and one operatory needs four core trays. Two operatories running endodontics at the same time need six, not seven, because the reprocessing load is shared before you round up.

Add-on kits need fewer sets, because they are opened only for matching cases.
Time your own reprocessing for a week before you order instruments. Autoclave capacity often turns out to be the real limit, rather than the number of instruments.
Sterility Checks Before the Pack Is Opened
Before opening a tray, the assistant should confirm that:
the pouch or cassette wrap is intact and dry;
the external process indicator has changed colour;
the pack is still within the practice's stated storage time.
Inside the pack, an internal chemical indicator confirms that steam reached the contents. Integrating indicators (Class 5) respond to temperature, time and steam together, so they tell you more than simple process tape.
If any indicator has failed or is unclear, the pack goes back for reprocessing. It is never opened on the grounds that "the cycle usually works". Record the failure and the autoclave cycle number, so a repeat fault can be traced.
Follow the manufacturer's single-use labelling for files and irrigation tips. A file marked single-use goes into the sharps container after the case, not back on the tray.
Measuring Whether the Tray Works
The simplest measure is the number of mid-procedure fetches: any item retrieved from outside the tray after the dam is placed. Log these for a month.
Worked example (hypothetical): a practice averages 3 fetches per RCT. Each fetch costs about 1.5 minutes of degloving, searching and regloving, and the practice performs 30 RCTs a month.
Current loss: more than two hours of chair time a month.
If a revised tray cuts fetches to 1 per case: about 45 minutes a month.
Also track:
set-up time across different assistants, which should become consistent once the list is standard;
RCT appointments that overrun their slot;
unused items opened per case;
indicator failures, and whether each one was acted on.
Use the log to adjust the tray. An item fetched repeatedly belongs on the core tray or in an add-on kit. An item that comes back unused week after week should come off the core tray.
Keep the Tray List in the Sterilisation Area, Not in Someone's Head
Post the written core and add-on lists in the sterilisation area, with a photograph of a correctly laid-out tray. The treating dentists should agree any change to instruments, file systems or materials before the list is updated, and every chair then follows the new version.
Some cases are better referred than accommodated by expanding the tray: severely curved or calcified canals, separated instruments and complex retreatments among them.
To source instruments and consumables zone by zone, the DentalKart endodontics range is organised by product type.
Frequently Asked Questions
If the file system is labelled single-use, open a sterile pack for each case and keep it beside the tray rather than on it, so unused files do not go through reprocessing. If the files are reusable under the manufacturer's instructions, use a sterile file stand or organiser on the tray. It keeps the sizes in sequence and makes it easy to count them back at the end.
Cassettes keep instruments in their zones through washing, sterilising and storage. That speeds up set-up and reduces handling, but it needs an autoclave large enough to hold them and a compatible washer. Pouches suit smaller practices and add-on kits, although they take longer to lay out each time. Many practices use cassettes for the core tray and pouches for the add-on kits.
On the assistant's side, within reach but off the sterile field, with the cords routed away from the tray. Check the battery and calibration before the patient is seated. Our article on reducing an endomotor's operational cost covers the routine checks that prevent mid-case failures.
Written by
Dr. Gurjeet
Contributing Dental Clinician
Dr. Gurjeet is a practising dental clinician contributing to Dentalkart Blogs, sharing chair-side experience, treatment protocols, and equipment insights for the wider dental community.
Keep reading
Browse all →
Bulk Buying Endodontic Supplies for Dental Clinics
What Should a Dental Clinic Consider Before Buying Endodontic Products in Bulk?Before buying endodontic products in bulk, check four things:How much your clinic

Dental Group Endodontic Purchasing Policy and Best Practices
How Can Dental Groups Create a Standard Endodontic Purchase Policy?A dental group or chain creates a standard endodontic purchase policy in five steps. First, a
New Dental Clinic Endodontic Procurement Checklist and Guide
How Should a New Dental Clinic Build Its First Endodontic Procurement List?Build it in this order. Have the treating dentists choose one instrumentation and obt